Seamless Migration from Tally Prime to ERPNext with One-Click Automation
In this blog, we’ll explore an automated solution in ERPNext using a Page called Tally Migrator that imports Master and Daybook data directly from Tally XML files with minimal manual effort
Migrating from Tally Prime to ERPNext is often considered a complex and time-consuming task. Businesses usually spend days manually importing masters, validating vouchers, correcting mappings, and resolving data inconsistencies.
To simplify this entire process, we built a guided migration tool inside ERPNext called the Tally Migrator.
The Tally Migrator is a step-by-step wizard that brings your Masters (accounts, customers, suppliers, items and opening balances) and your Day Book (accounting vouchers) into ERPNext straight from Tally Prime's XML export.
It checks your file and shows you a preview first, so nothing changes in ERPNext until you are ready. Your existing ERPNext data is also safe: nothing is ever overwritten or deleted. If a record already exists, the migrator skips it, so you can run it as many times as you like.
How the Tally Migrator Works
You can run two kinds of import:
1. Masters: accounts, customers, suppliers, items, warehouses and opening balances
2. Day Book: accounting vouchers, imported as Journal Entries
Both imports go through the same five-step wizard. A progress bar at the top shows where you are:
Upload → Configure → Check → Preview → Migrate
The Preview step only appears when your file contains accounts. A file with no accounts goes through four steps.
Complete Migration Flow
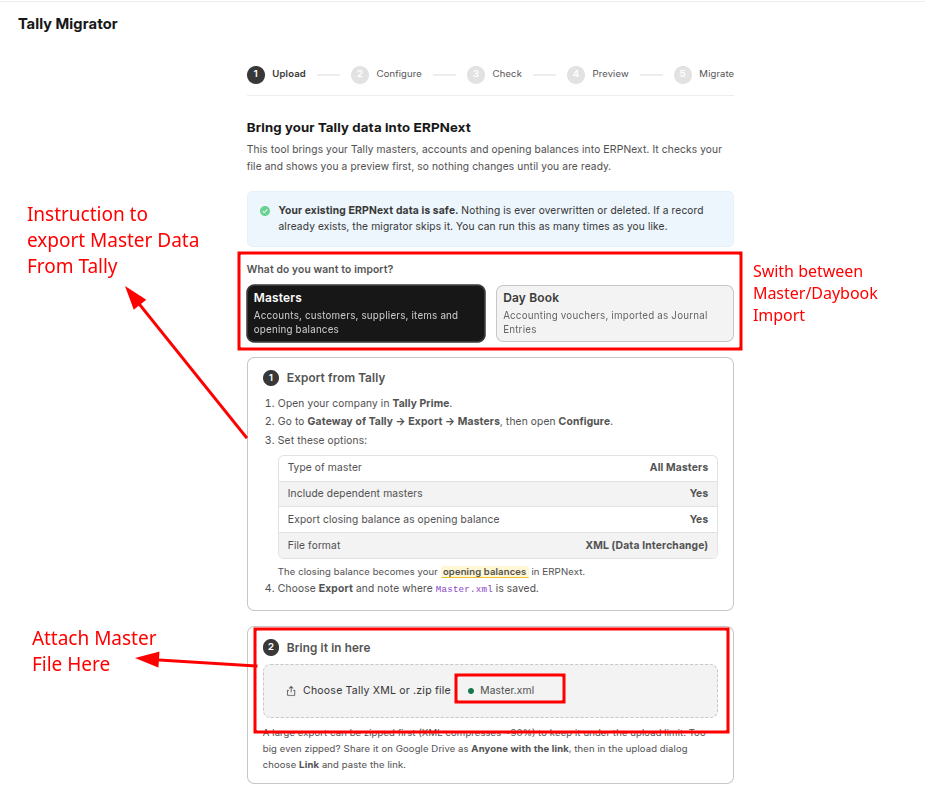
Step 1 – Export XML from Tally Prime
The Tally Migrator shows the export instructions on screen, so you don't need to look them up.
For Masters: open your company in Tally Prime, go to Gateway of Tally → Export → Masters, open Configure and set:
| Option | Value |
| Type of master | All Masters |
| Include dependent masters | Yes |
| Export closing balance as opening balance | Yes |
| File format | XML (Data Interchange) |
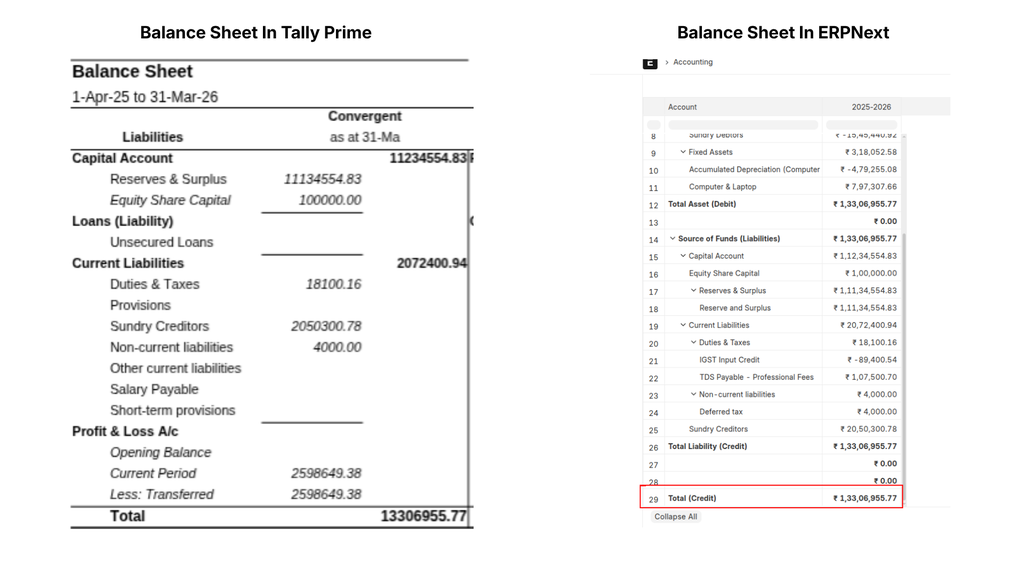
The Tally closing balance becomes your opening balance in ERPNext.
For Day Book: go to Display More Reports → Day Book and export it as XML (Data Interchange).
| Export | What it contains |
| Master XML | Chart of accounts, customers, suppliers, items, warehouses, units of measure and opening balances |
| Day Book XML | Accounting vouchers (payments, receipts, journals and so on) |
Always import Masters first. Day Book vouchers post to accounts, customers and suppliers that must already exist in ERPNext.
Step 2 – Upload
Open the Tally Migrator page in ERPNext, choose Masters or Day Book, and upload the file.
You can upload the XML directly or as a .zip file. Tally XML usually shrinks by about 90% when zipped, which helps large exports fit under the upload limit. If the file is still too large, you can share it from Google Drive as "Anyone with the link" and paste the link into the upload dialog.
As soon as the file is uploaded, the migrator reads it and shows what it found, for example:
- Number of customers, suppliers, items and warehouses
- Number of accounts and cost centres
- The Tally company name in the file
- For Day Book: vouchers ready to import, vouchers that will be skipped, and a count for each voucher type
If the file is empty or is the wrong type of export, the migrator says so and asks you to export again.
Step 3 – Configure
Choose where the data should go:
- ERPNext Company: the company that will receive the records
- Chart of Accounts: either reuse ERPNext's standard accounts (recommended), where Tally's reserved groups map onto ERPNext's built-in chart and only your custom groups and ledgers are created, or mirror Tally's group tree exactly
- Opening-balance date: the posting date for opening balances and opening stock. If you leave it blank, the start of the company's current fiscal year is used.
This step also shows a summary of what will be imported.
Step 4 – Check
Before anything is created, the migrator compares your file with what already exists in ERPNext. Nothing is changed automatically. You decide how to handle anything that doesn't match.
The check covers:
- Data quality: invalid GSTINs, GSTINs that don't match the state, missing GST state, PIN codes that don't match the state, invalid emails, missing HSN codes, item code collisions, possible duplicate parties, and loops in the group hierarchy
- Inline fixes: you can correct flagged fields, such as a GSTIN or state, directly on screen and click Re-check. Your Tally file is never modified.
- Units of Measure: any Tally unit that doesn't exist in ERPNext is listed. You can create it as a new unit or map it to a unit you already use.
- Company readiness: the migrator confirms the company can receive the data, for example that a Fiscal Year covers the dates and that accounts aren't frozen. Blocking problems are shown with a suggested fix, and you can re-check once they are resolved.
- Field coverage: if your file has fields, such as custom fields, that have no matching field in ERPNext, the migrator names them so you can decide whether they matter.
If some records still have errors, you can tick a box to continue with the rest and re-import the failed records later.
For a Day Book, this step also compares voucher dates with your Masters opening-balance date. Vouchers dated before it are already included in the opening balances, so they are skipped automatically and never posted twice.
Step 5 – Preview
When your file contains accounts, you can see how they will appear in ERPNext before importing:
- How each Tally ledger will be classified in ERPNext's chart of accounts, with its opening balance
- Ledgers under custom Tally groups whose account type the migrator had to work out from the group, flagged so you can confirm them
- The full chart of accounts with Dr/Cr subtotals for each group
- Customer and supplier opening balances, posted bill by bill so you can match future payments against individual invoices
- Parties whose bills don't add up to their ledger opening. The difference is posted as an "On Account" opening so the party still matches the trial balance.
- Foreign-currency parties, whose openings are posted in their own currency at the rate recorded in Tally
Step 6 – Migrate
Click Run Migration. The import runs in the background with a live progress bar. You can leave the page at any time and come back later, and the migrator reconnects to the running job.
A Masters import creates:
- Accounts and Account Groups
- Cost Centres
- Customers and Suppliers, with their Addresses and Contacts
- Items and Item Groups
- Units of Measure
- Warehouses
- Opening balances: an opening Journal Entry, an opening Stock Reconciliation, and bill-wise opening invoices for customers and suppliers
A Day Book import creates Journal Entries for balanced, accounting-only vouchers. Vouchers that contain stock items, cancelled vouchers, and Tally's system Profit & Loss A/c entries are skipped, and each one is listed in the log.
When the run finishes, you see a summary for each record type:
| Result | Meaning |
| Imported | Newly created in ERPNext |
| Already there | Skipped because it already existed. Nothing was changed. |
| Warnings | Imported, but a related piece (address, contact, opening balance) was dropped |
| Failed | Could not be imported. The log gives the reason. |
Behind the Scenes – How It Works
XML Parsing Engine
The uploaded Tally XML or zip file is parsed on the server. The parser extracts:
• Account groups and ledgers
• Customers and suppliers, with GST, address and contact details
• Items, item groups, units and warehouses
• Opening balances, including bill-wise party balances
• Voucher types and voucher entries
Large files are read in the background, so the browser doesn't time out.
Smart Data Validation
Before anything is imported, the migrator runs a full pre-flight check. It covers:
• GSTIN, state, PIN and email validation
• Duplicate party and item code detection
• Missing units of measure
• Company readiness (fiscal year, frozen accounts)
• Day Book dates checked against the opening-balance date
If the check can't finish, the migrator says so and does not let you import. It never reports a failed check as a pass.
Safe, Repeatable and Reversible
The migrator only creates records. It never overwrites or deletes existing data. Records that already exist are skipped, so you can fix a problem in Tally, upload the file again, and only the missing records will be imported.
Every run creates a Tally Migration Log that lists each record the run touched, with the reason for every warning and failure. If you need to undo a migration, you can revert it from the log. You type the company name to confirm, and the revert runs in the background.
If you leave partway through, your progress and fixes are saved as a draft. The next time you open the page, you can continue where you stopped.
Why This Approach is Better Than Manual Migration| Traditional Migration | Tally Migrator |
| Multiple Excel imports | Direct XML or zip upload |
| Manual account mapping | Automatic chart-of-accounts mapping with a preview |
| Errors found after import | Pre-flight check with fixes on screen |
| Opening balances keyed in by hand | Bill-wise opening balances that match the trial balance |
| Requires technical knowledge | Guided step-by-step wizard |
| Risk of overwriting existing data | Only creates records and skips existing ones |
| Hard to undo | Full migration log, with an option to revert the run |
Conclusion
Migrating from Tally Prime to ERPNext no longer has to be a difficult, manual process. The Tally Migrator brings in your Masters, Opening Balances and Day Book vouchers through a guided XML-based wizard inside ERPNext.
Each step shows you what will happen before it happens: what is in the file, what needs fixing, how your accounts will map, and what was imported.
Because it never overwrites data, can be re-run safely and can be reverted, businesses can move from Tally Prime to ERPNext with less effort, fewer errors and more confidence.
No comments yet. Login to start a new discussion Start a new discussion